News & Knowledge

What is Bleed? A Complete 4-Step Guide to Setting Bleed Dimensions
Is it your first time printing a vital design or artwork, and you feel confused when the printer asks if you have added “bleed dimensions”? What is “bleed”? How do you set the dimensions? To understand the basic printing concepts, let this article explain the importance of reserving bleed dimensions, helping you succeed in your first print job without any issues!

Table of Contents
ToggleWhat is Bleed? How are Bleed Dimensions Related to Printing?
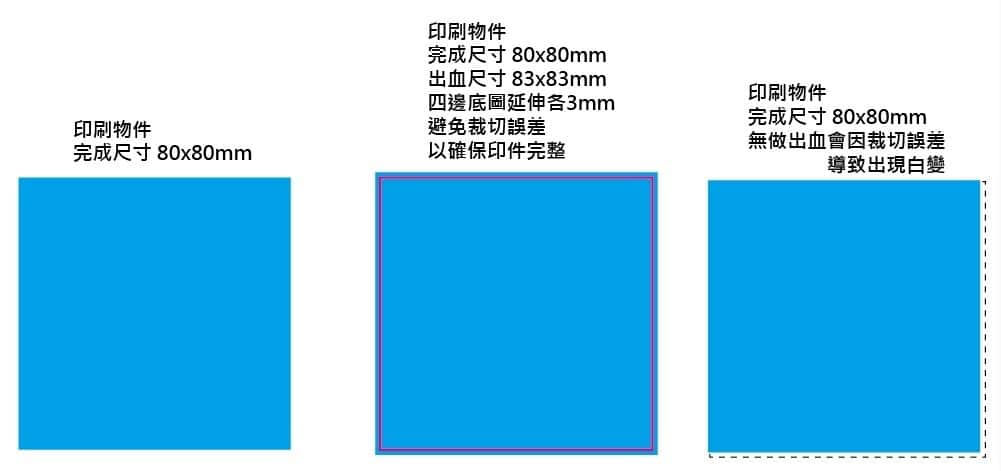
“Bleed” refers to the extra space added to the edges of a design that will be trimmed off after printing. Bleed ensures that the background color or image extends to the edges of the print, preventing any unprinted areas (white edges) on the final product. Typically, the standard bleed dimension is 3mm. It means adding 3mm of space beyond the edges of the finished design to account for trimming variations.

When handling print designs, reserving bleed dimensions serves three primary purposes:
- Preventing White Edges: Ensures the final printed product does not have unprinted areas at the edges.
- Protecting Important Content: Prevents essential design elements from being cut off during trimming.
- Maintaining Accurate Final Dimensions: The final product size matches the intended dimensions after trimming.
4-Step Guide to Setting Bleed Dimensions
How do you set bleed dimensions? Below is a simple 4-step guide using Illustrator, a commonly used tool.
STEP 1:Open File

Open the software and select “New Document.”
STEP 2:Set Page Size
In the “Width” and “Height” fields, set the dimensions of your document.
STEP 3:Set Bleed Dimensions
In the “Bleed” fields, enter 3mm for “Top,” “Bottom,” “Left,” and “Right,” then click the confirmation button in the lower right corner.
STEP 4:Set Display Guides


After clicking confirm, a white page will appear. Right-click the black area around it and check “Show Guides.” A red border will appear outside the original white box, indicating the bleed area. Once set, ensure that your design extends to fill the bleed area to avoid issues with the printed document.
4 Important Considerations for Setting Bleed Dimensions
However, besides the main steps mentioned above, paying attention to the following details is also recommended when setting bleed dimensions.
-
Ensure Correct Template and Bleed Values Before Printing
When designing a document, it is advisable to use a template that includes bleed areas to avoid the risk of important content being cut off. As previously mentioned, the standard bleed dimension is usually 3mm. Below, we explain how to calculate bleed dimensions using standard print sizes as examples.
| Final Dimensions | Bleed Dimensions on All Sides | Bleed Dimension Frame | |
| A4 | 210 x 297mm | 3mm | 216 x 303mm |
| A5 | 150 x 210mm | 156 x 216mm | |
| A6 | 100 x 150mm | 106 x 156mm | |
| Business card | 90 x 55mm | 96 x 61mm |
-
Avoid Placing Important Content Near the Edges
Even with bleed dimensions set, trimming may still have some inaccuracies. Therefore, when designing or typesetting, keep important content at least 5mm from the trimming edge.
-
Set Appropriate Resolution and Color Mode
In addition to bleed dimensions, the resolution and color mode of images must be set correctly to ensure the quality of the printed product. The recommended resolution is 300 dpi, and the color mode should be set to CMYK, the standard color mode for printing.
💡Reminder: The RGB color mode is usually for screen display and is not recommended for printing.
-
Communicate Properly with the Printing Company
Finally, it is recommended that every detail and requirement be fully and adequately communicated with the printing company before printing to ensure the document meets the desired specifications. If you are unsure how to set up the file, consult the printing company; they may have specific requirements or professional advice.
Common Questions About Printing Bleed Dimensions
Q1: Does the bleed dimension always have to be 3mm?
Yes, if the bleed dimension is not correctly set and is less than 3mm, it can result in white edges around the printed document. This can affect the final product’s appearance, quality, and dimensions.
Q2: What happens if the color mode or resolution is set incorrectly?
If the document’s color mode is not changed to CMYK and remains in RGB, the printed product may differ from the expected result. If the resolution is too low, the final product may appear blurry, pixelated, or jagged, reducing its quality.
With the above introduction, you should understand the importance of bleed dimensions and the considerations when preparing print documents. If you still have questions about printing, it is recommended to refer to this article: Common Units and Professional Terminology in Printing and Paper, which will introduce the basic knowledge related to printing!
